Hi. We're Barry & Phoenicia, and we're going to show you
how to make Kombucha Tea.
how to make Kombucha Tea.

Why should you make your own
KOMBUCHA TEA?
Because it's far more delicious than any of the
bottled Kombucha Teas you can buy at the store,
and, a heck of a lot cheaper.
And, because the 'SCOBY', (you end-up with), just keeps making
more 'SCOBIES' as you brew each batch.
It's like a perpetual fermentation machine...
a gift that just keeps on giving!
So...
1) The first thing you have to do is: buy the KOMBUCHA CULTURE.
We got ours from a most reputable online source: 'Kombucha America'. Please read their website. They have so much valuable information.
We researched KOMBUCHA all over the web, from books at the library, and even bought a couple of books on the subject. We found that 'Kombucha America' was the best online-site for this stuff.
They are above-board in their business dealings, their prices are fair, and their customer service exemplary. They are a very trustworthy company that we highly recommend. And, no, we are not in any way affiliated with them. We're just extremely happy customers.
(all of the following links on this page will open in a separate window, so,
you don't have to worry about losing your place here)
Kombucha America-- 'Home' page:
Kombucha America-- 'Illnesses Helped' page:
Kombucha America-- 'History and Composition of Kombucha Tea' page:
~~~~~~~~~~~~~~~~~~~~~~~~~~~~~~~~~~~~~~~~~~~~~~~~
2) COST? For two Cultures, about $22-bucks plus s/h, totaling approximately $30-bucks. They are mailed to you thru USPS, and, will ship to a PO Box if you need that.
Kombucha America 'Order' Page:
For buying two Cultures, you get a 'Lifetime Replacement Guarantee', so, buying two was worth it for us... mainly because we knew we were gonna be drinking this stuff for the rest of our lives!
Each Culture makes 1-Gallon of Kombucha Tea
One Gallon of Tea equals 16-Cups
Drinking 2-Cups-a-day equals 14-Cups-a-week
The left-over 2-Cups will be used to make the next batch
~~~~~~~~~~~~~~~~~~~~~~~~~~~~~~~~~~~~~~~~~~~~~~~~
3) A KOMBUCHA CULTURE is not a 'SCOBY'.
The CULTURE, itself, is a clear liquid that comes in a vial; whereas a 'SCOBY' is the fully-grown KOMBUCHA CULTURE that has gone thru the 'fermentation' process.
You can purchase fully-grown 'SCOBIES'; but, we made the decision to grow our own from the CULTURE. There was just something about getting a full-grown 'SCOBY' in the mail that didn't sit right with us.
 |
| The liquid CULTURE comes in a small vial |
 |
| A fully-grown SCOBY packaged and ready to mail |
~~~~~~~~~~~~~~~~~~~~~~~~~~~~~~~~~~~~~~~~~~~~~~~~
4) Next, you need GLASS or CERAMIC CONTAINERS, (NO plastic!), that the Kombucha Tea is going to be made in. We got our Glass Containers at Dillards, (Jay Import 'Springfield' Double Drink Dispenser with Stand). They each hold 1.38-gallons... $60-bucks for the two of them.
As an aside, we first got two, 1-Gallon Glass Containers at the market for about $10-bucks each... you know, the ones with the little flowers or butterflies on them. UGH! What trash! They both leaked terribly, and not only from the spouts, but from the bottom of the jugs as well! Cheap, cheap, cheap. We took them back forthwith having learned our 'cheapo' lesson the hard way.
So, yeah, the ones from Dillards were expensive, but they are heavy-duty, thick-walled Glass Containers... total quality. And the Spouts are fabulous... they NEVER leak. For us, it was well-worth the money spent... they will last. I don't put them in the dishwasher tho... I hand-wash them.
Whatever you get, you want the Glass to be fairly-well 'see-thru' because you want to keep an eye on what's going on in there. With Ceramic jugs, you can't do that; nor with Glass jugs that are 'etched', 'dimpled', or have that 'foggy' treatment.
Since we ordered two Cultures, (knowing we were gonna be making 2-gallons of this stuff a week), we needed two Containers; so, the ones we found at Dillards were perfect for our purposes. We don't use the Stand that came with them, nor do we use the Glass Lids... more on that as we go along.
Glass Containers from Dillards:

~~~~~~~~~~~~~~~~~~~~~~~~~~~~~~~~~~~~~~~~~~~~~~~~
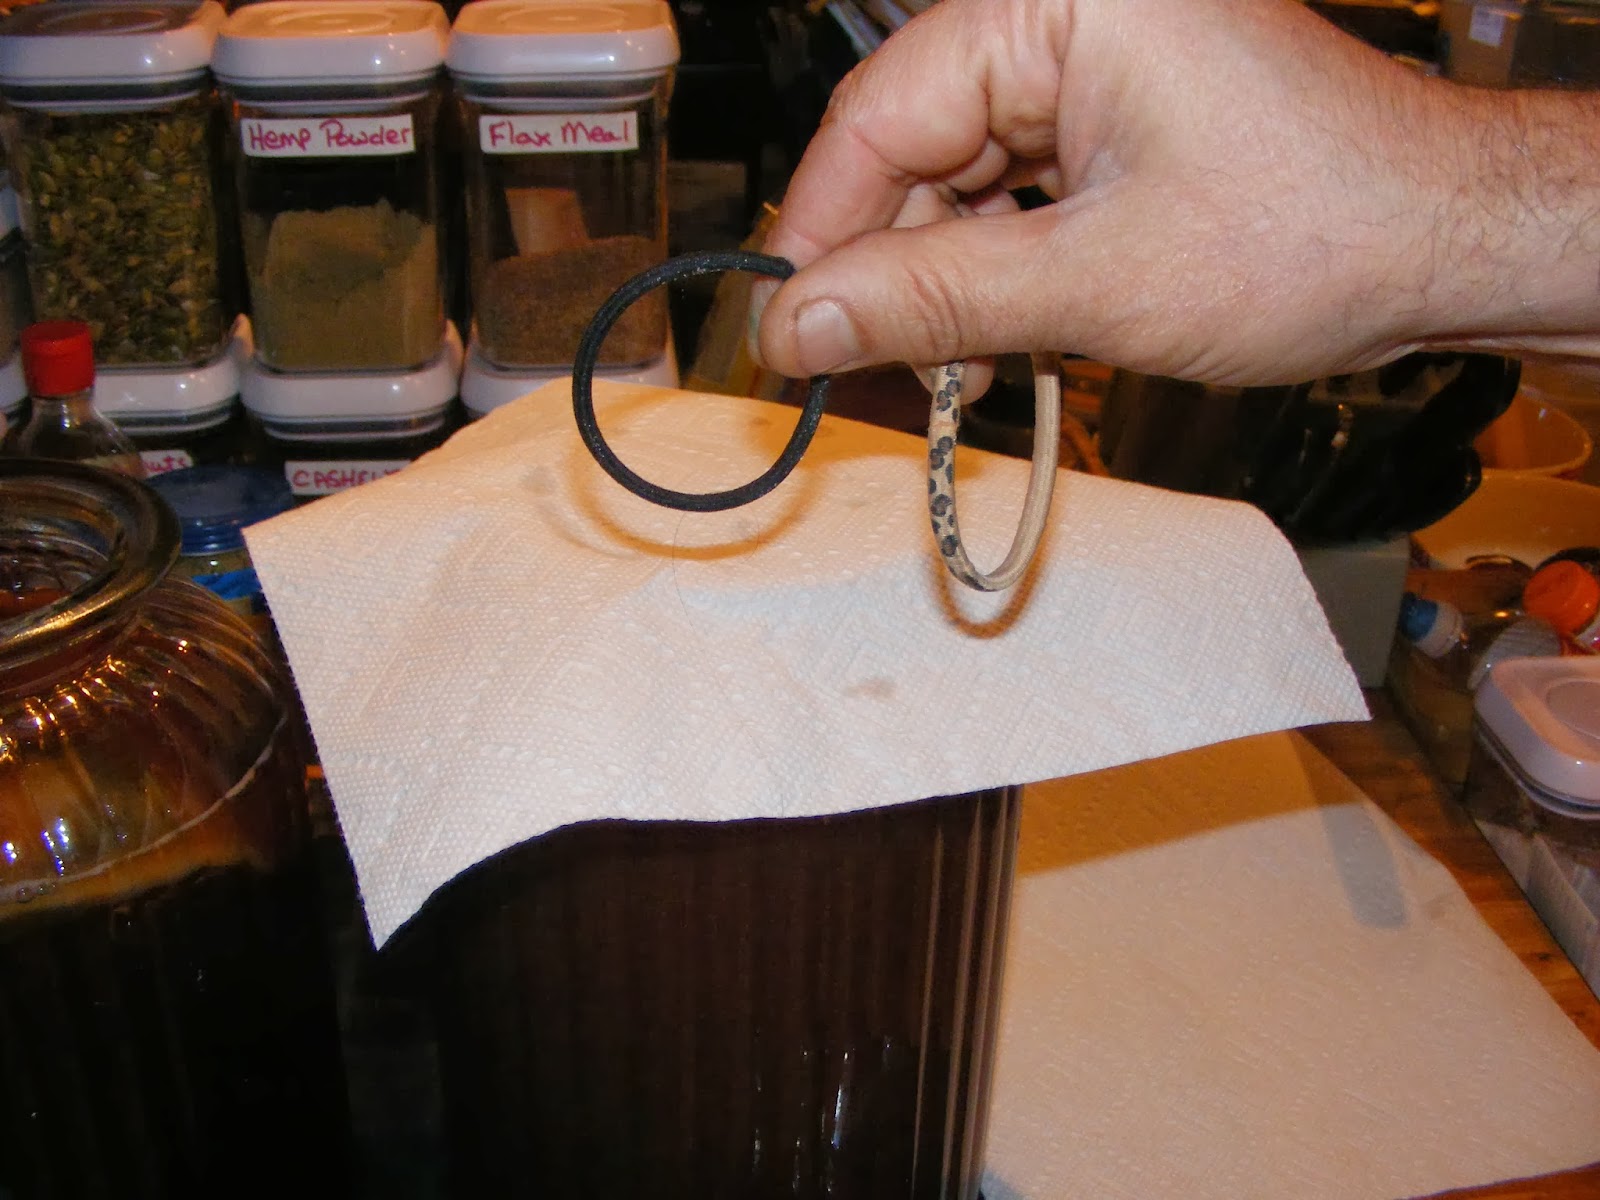
5) Next, you've got to get two RUBBER BANDS... big ones. And, they've got to have some kind of coating around them... 'hair ties' really. If they're just plain rubber bands, they will tear the paper towel you will use to cover the top of the jug. We found ours at the supermarket in the 'hair care' section.
~~~~~~~~~~~~~~~~~~~~~~~~~~~~~~~~~~~~~~~~~~~~~~~~
6) SEE THE UPDATE BELOW PAPER TOWELS. Sheesh, you'd think it would be such an easy thing, *lol*. But, a lot of the Paper Towels made today come 'sectioned'. This will not work as the sections will tear when you try to put on the rubber band. You have to have a single-sheet paper towel that is large. We use the 'Bounty' brand.
UPDATE
October 27-2013
We have since found a wonderful product that bypasses this whole mess with using Paper Towels. They are Lid Covers that are stitched with elastic...
it couldn't be easier to use these things! They're FABULOUS!
Get 'em here... from KombuchaKamp: about $10-bucks-a-piece

~~~~~~~~~~~~~~~~~~~~~~~~~~~~~~~~~~~~~~~~~~~~~~~~
7) You're gonna need SUGAR... 1-1/2 Cups per gallon.
~~~~~~~~~~~~~~~~~~~~~~~~~~~~~~~~~~~~~~~~~~~~~~~~
8) You're gonna need some APPLE CIDER VINEGAR... 1/4-Cup per gallon.
(This is for your first batch only. After that, you will use the left-over 2-Cups,
from the gallon of Kombucha Tea you just made, for successive batches)
~~~~~~~~~~~~~~~~~~~~~~~~~~~~~~~~~~~~~~~~~~~~~~~~
9) You're gonna need TEA... and lots of it. We have found that we just can't brew a better-tasting tea than 'TEJAVA TEA'. The flavor is out of this world.
Tejava is unsweetened and can be purchased at Safeway or Albertsons. If caffeine is a concern for you, (as drinking this tea late in the afternoon, or evening, may keep you up at night), then you should find either a bottled Decaf Tea, or brew your own.
As well, using the Tejava Tea, or any bottled tea, allows you to not have to let 'brewed tea' cool-down. This is important because you cannot add either the 'Kombucha Cultures', (or the 'Scobies' ), to hot liquid.

We use 3-bottles of Tejava Tea for each gallon of Kombucha Tea, and 1-bottle for the saucepan to dissolve the Sugar. So, every week, we go thru 4-bottles of this stuff because that is what Barry likes, and the caffeination does not bother him.
I, on the other hand, cannot tolerate so much caffeine. So, I brew Bigelow's Decaf Green Tea to make my Kombucha. I get this on the Subscribe & Save Program at Amazon.

~~~~~~~~~~~~~~~~~~~~~~~~~~~~~~~~~~~~~~~~~~~~~~~~
FINALLY!
Now that you've got all the tools you need to make
the 'KOMBUCHA TEA',
here are the steps...
10) Put a saucepan on the stove and pour in a bottle of TEJAVA TEA. Bring it to a boil, and add the SUGAR. Turn off the heat and give it a stir; (if you're making two-gallons of 'Kombucha Tea', you will use 3-Cups of Sugar).


~~~~~~~~~~~~~~~~~~~~~~~~~~~~~~~~~~~~~~~~~~~~~~~~
11) Take this hot, sweetened TEA off the stove and pour 1/2 of it into each of your Containers, no need to let it cool-down... (but, if you brew a gallon of your own tea, you have to let the tea cool-down to room-temperature first before pouring into the Containers... and this 'waiting' is 'time-consuming').


~~~~~~~~~~~~~~~~~~~~~~~~~~~~~~~~~~~~~~~~~~~~~~~~
12) Now, pour 3-bottles of Tejava Tea into each of the Containers. What this does is cool-down the hot, sugared TEA you previously poured in, thus, saving lots of time. We go thru all these steps, start-to-finish, in about 10-minutes... after the 1-bottle of tea has boiled on the stove first, of course!
If you brew your own tea, you have to wait a really long time for it to cool-down to room-temperature before you can pour it into the Containers, and to then add the Cultures or the Scobies. It makes the whole process so time-consuming, as stated before.


You will be able tell, (by feeling the sides of the Containers), that the TEA inside is now room-temperature. This is important because room-temperature is what you need to be able to add the 'Kombucha Cultures', (or the 'Scobies' in successive batches), without harming them.
~~~~~~~~~~~~~~~~~~~~~~~~~~~~~~~~~~~~~~~~~~~~~~~~
13) If this is your first batch, now is the time you will add 1/4-Cup of APPLE CIDER VINEGAR to each Container... give it a stir.
You will not have to repeat this step in successive batches.
~~~~~~~~~~~~~~~~~~~~~~~~~~~~~~~~~~~~~~~~~~~~~~~~
14) Now it's time to add the KOMBUCHA CULTURE. Just pour it right out of the Vial and into the TEA... give it a stir.
~~~~~~~~~~~~~~~~~~~~~~~~~~~~~~~~~~~~~~~~~~~~~~~~
15) SEE THE UPDATE BELOW! Take a PAPER TOWEL and put it over the top of the Container. Very gingerly, roll the coated Rubber Band over the Paper Towel to adhere it to the jug.
You might tear a towel or two before you get it right... we did, *lol*. It works much more easily when one person holds the towel and another person rolls the rubber-band over it. Oh, and when holding the towel down, don't make it taut... allow a good amount of wriggle room... this will keep the possibility of tearing to a minimum.
You want to use a PAPER TOWEL instead of the Lids that came with these, (or any other), Containers, because the Kombucha Culture needs to breathe. The Kombucha Culture feeds on both the Sugar and Vinegar, and needs Air to facilitate the fermentation process in order to grow into a 'SCOBY'.
PAPER TOWELS accomplish this task, as well as keeping out dust, dirt, etc etc. You don't want to use cheesecloth (too loose a weave) or a dish towel (too tight a weave). Paper Towels are just right.


UPDATE
October 27-2013
We have since found a wonderful product that bypasses this whole mess with using Paper Towels. They are Lid Covers that are stitched with elastic...
it couldn't be easier to use these things! They're FABULOUS!
Get 'em here... from KombuchaKamp: about $10-bucks-a-piece

~~~~~~~~~~~~~~~~~~~~~~~~~~~~~~~~~~~~~~~~~~~~~~~~
16) Now, Barry's Kombucha Tea, (on the right above), is strangely-coloured because he added an Acai-Pomegranate Fruit Juice to his; (I like mine plain, as shown on the left-side). If this is your first batch, wherein you're using the liquid KOMBUCHA CULTURE in the Vial, DO NOT ADD ANY FLAVOURINGS. Wait until the second batch when you have an actual 'Scoby' to work with.
If you want your first batch flavoured,
add it to your Pitcher after the Kombucha Tea is made.
~~~~~~~~~~~~~~~~~~~~~~~~~~~~~~~~~~~~~~~~~~~~~~~~
17) (SEE THE UPDATE BELOW) THE LAST STEP is putting your Containers somewhere. We made a place on a shelving unit we have in our laundry room.
The TEA needs to stay more than a little WARM during the 'fermentation proceess'... remember, the Kombucha is growing! Ideally, a temperature of 79-to-84 degrees is best, as 'cold' will retard the growth. We decided to wrap some fleece around our containers to accomplish this 'ideal' temperature.
UPDATE
October 27-2013
PLEASE NOTE
Now that we're getting into Winter, we've found that just wrapping the fleece around the Containers is not enough to keep the
fermenting Tea at an ideal temperature.
And, if the fermentation process gets too cold, well,
that's when 'mold' will start growing... yuck!
We're experimenting with a Heat Pad underneath, but,
it won't stay turned on continually...
it has one of those automatic shut-off thingy's.
SO... Now we've ordered a thing called a 'Heat Belt' that is used for
Beer & Wine-making. We got this over at Amazon and, I'm happy to report, it works beautifully! During the freezing-cold winter months here, (we live in the mountains), this belt has provided the perfect amount of heat to keep our brewing Kombucha at the proper temperature (79-84 degrees Fahrenheit). Get one!
'Brew Belt' Fermentation Heating Belt at Amazon

With your first, and probably second, batch of TEA, you will want to put some kind of Label on the Containers that has the Date on it. It took our first batch 9-days to come to completed fruition. Subsequent batches have only taken a week, so, now we just make this stuff every Saturday.
As you can see, I also add 'Health, Wealth, & Happiness' labels. It can't hurt and, who knows, it might just help as we drink this stuff! One of my more brilliant ideas, *lol*.
 |
| Labels, and my black fleece cape, *lol* |
~~~~~~~~~~~~~~~~~~~~~~~~~~~~~~~~~~~~~~~~~~~~~~~~
18) Now comes the waiting. The first batch makes you crazy. It's like the last week of a pregnancy when you're waiting for 'that moment' when you know it's time to go to the hospital! Every day you go in to check on the progress. At first, it looks like nothing is happening, and you start to panic. You wonder, 'Did I do it right? Did I follow the steps correctly?' *lol*
Then comes the third or fourth day... you start to see kinda 'bubbly stuff'. Every day, from then on, you see more and more 'stuff'... and, let me tell you, it ain't pretty! *lol*
But, never fear, all is well-- it's supposed to look like that. Like we said before, this stuff ferments, thus, it looks very 'yeasty' and 'yucky', *lol*.
SO, DON'T PANIC!


~~~~~~~~~~~~~~~~~~~~~~~~~~~~~~~~~~~~~~~~~~~~~~~~
19) In the end, what you will end-up with is called a 'SCOBY'. All that 'goo' has solidified and given its goodness to your KOMBUCHA TEA.
The first batch tastes really 'vinegary' because of the APPLE CIDER VINEGAR that was added to help the KOMBUCHA CULTURE get going.
But, once you have a 'SCOBY', you don't need to add vinegar to your successive batches anymore... the 'SCOBY' does it all on its own.

~~~~~~~~~~~~~~~~~~~~~~~~~~~~~~~~~~~~~~~~~~~~~~~~
20) The 'SCOBY', itself, feels weird, *lol*... kind of rubbery. It is strong, but oh-so-pliable, and slippery!
When your TEA is ready, take your Container to your kitchen counter-- next to the sink. Take the 'SCOBY' out with your hands, (don't use utensils for this), rinse it off in cold water, and put it right into a Glass Container.
We use our Lidded 7-Cup, (1.75-qt), Pyrex bowl for this as it fits the 'Scoby' so perfectly... from Amazon:
http://www.amazon.com/Pyrex-Storage-7-Cup-Round-Plastic/dp/B000LOWN3C/ref=sr_1_1?ie=UTF8&qid=1382305356&sr=8-1&keywords=pyrex+1.75+qt+bowl

If you can't make another batch of KOMBUCHA TEA right then and there, add 4-Cups of the Kombucha Tea to the Pyrex, put the lid on, and put it in the refrigerator. It can store in the fridge for a long time... at least a month! So, if you go on vacation, don't worry... your 'SCOBY' will be healthy, and ready, to make you more KOMBUCHA TEA when you get back.
~~~~~~~~~~~~~~~~~~~~~~~~~~~~~~~~~~~~~~~~~~~~~~~~
HOW DO YOU KNOW WHEN YOUR KOMBUCHA TEA IS READY?
You taste it. This is where those 'Spouts', we spoke of, really come in handy. You just siphon a little into a glass and taste it. If it tastes 'weak', it's not done. If it has a 'strong, hearty' taste, it's ready.
If you use a Container that doesn't have a 'Spout', you have to remove the 'Paper Towel' and then reattach it if you're TEA isn't ready... a step that is easily avoided if you have a 'Spout'.
~~~~~~~~~~~~~~~~~~~~~~~~~~~~~~~~~~~~~~~~~~~~~~~~
21) Now comes the time to get your KOMBUCHA TEA into usable Pitchers, and start another batch! It's easiest to use a 4-inch Fine-Mesh Strainer to strain the TEA. If you don't have one, get one, *lol*, because it's a lot less hassle than using cheesecloth.
4-inch Strainer from Amazon:
http://www.amazon.com/HIC-Brands-Cook-Strainer-4-Inch/dp/B0042X9XAE/ref=sr_1_5?ie=UTF8&qid=1382983949&sr=8-5&keywords=4-inch+fine+mesh+strainer

You need to strain the TEA because there are little bits, and stringy filaments, from your just-created 'SCOBY', and you really don't want to drink that stuff, (it won't hurt you, it's just not very palatable... eeesh... I shudder just thinking about it, *lol*.)
4-inch Strainer from Amazon:
http://www.amazon.com/HIC-Brands-Cook-Strainer-4-Inch/dp/B0042X9XAE/ref=sr_1_5?ie=UTF8&qid=1382983949&sr=8-5&keywords=4-inch+fine+mesh+strainer
You need to strain the TEA because there are little bits, and stringy filaments, from your just-created 'SCOBY', and you really don't want to drink that stuff, (it won't hurt you, it's just not very palatable... eeesh... I shudder just thinking about it, *lol*.)
(and this is also why you want to wash your Containers by hand, not put them thru the dishwasher... any stringy stuff may not completely
wash out as it tends to get stuck a bit in the Spouts)
wash out as it tends to get stuck a bit in the Spouts)
Now then, DON'T use the 'SPOUT' feature to do this straining... it will take forever. You want to pour the TEA from the top of the Glass Container into your PITCHER.

The Pitcher can be make of plastic. We have two, 1-Gallon pitchers for this; (they are made by Sterilite and can be purchased, usually, at a 'Dollar Store' or on Amazon). Then, store your TEA in the fridge.
It's best to put the Pitcher in the sink, place your Fine-Mesh Strainer over the top of it, and then strain the TEA into the Pitcher. In this way, if you have any spillage, it will go in the sink instead of all over your counter, and spilling onto the floor.
(Barry got first-hand experience of this kind of 'mess' when, so excited was he, he tried to strain the first Gallon of our first Batch on the counter instead of using the sink... geez... well, I didn't marry him because he was handy in the kitchen! *lol*)
Sterilite 1-Gallon Pitcher at Amazon:
http://www.amazon.com/Sterilite-Corp-04904106-Gallon-Pitcher/dp/B000LNTODA/ref=sr_1_2?ie=UTF8&qid=1382102622&sr=8-2&keywords=sterilite+pitcher

As you can see, Barry uses the Acai-Pomegrante Juice to flavor his KOMBUCHA TEA. I like mine plain, but pretty sweet, so I add Stevia to my batch instead.
We then pour our TEA from the Gallon Pitchers into smaller Sports-Bottles. I got these at Fry's supermarket. They hold 20-oz, (2-1/2 Cups), and originally had water in them. The brand is Kroger, and the water is called 'Simple Truth'.
We then pour our TEA from the Gallon Pitchers into smaller Sports-Bottles. I got these at Fry's supermarket. They hold 20-oz, (2-1/2 Cups), and originally had water in them. The brand is Kroger, and the water is called 'Simple Truth'.
We had to colour the rims of the bottles with magic markers so we could tell whose-was-whose... mine pink, Barry's green, *lol*.
These Sports-Bottles are so very useful. Barry can take his KOMBUCHA TEA to work in these because the Spout stays tightly shut. I keep mine in the fridge and, every time I open the fridge, I take a few swigs.
To really get the most benefit from the TEA, you want to drink at least 1-CUP, (8-oz), every day. On the 'Kombucha America' website, they suggest 1-3 Cups a day.
To really get the most benefit from the TEA, you want to drink at least 1-CUP, (8-oz), every day. On the 'Kombucha America' website, they suggest 1-3 Cups a day.
~~~~~~~~~~~~~~~~~~~~~~~~~~~~~~~~~~~~~~~~~~~~~~~~
22) When you go to strain your second batch of KOMBUCHA TEA, you will find that another 'SCOBY' has grown on top of the 'SCOBY' you used from the first batch! Just separate these two 'SCOBIES', throw the used one in the garbage disposal, and use the new one for your next batch of TEA.


~~~~~~~~~~~~~~~~~~~~~~~~~~~~~~~~~~~~~~~~~~~~~~~~
We're doing really well drinking 2-Cups a day each,
(1-Gallon equals 16-Cups),
THUS
(1-Gallon equals 16-Cups),
THUS
We've always got a batch of KOMBUCHA brewing as 1-Gallon,
for each of us, lasts a week.
for each of us, lasts a week.
We are experiencing great benefits from drinking this TEA. We're no longer having those low-blood-sugar 'crashes'; and our general 'aches and pains, (arthritis/rheumatism), and that 'tired, rundown feeling' from just plain getting older, have subsided. We absolutely feel more energy.
So, KOMBUCHA is working for us!
~~~~~~~~~~~~~~~~~~~~~~~~~~~~~~~~~~~~~~~~~~~~~~~~
It is our fervent prayer that
KOMBUCHA TEA
will help to cure what ails you...
KOMBUCHA TEA
will help to cure what ails you...
and our hope that this Blog has helped you achieve that goal.
! GOD BLESS !
p.s. If you have a care to write a 'Testimonial' about this Blog,
please do so at my 'Testimonials For Faire' page. Thank You!
~~~~~~~~~~~~~~~~~~~~~~~~~~~~~~~~~~~~~~~~~~~~~~~~
p.s. If you have a care to write a 'Testimonial' about this Blog,
please do so at my 'Testimonials For Faire' page. Thank You!
~~~~~~~~~~~~~~~~~~~~~~~~~~~~~~~~~~~~~~~~~~~~~~~~